Login
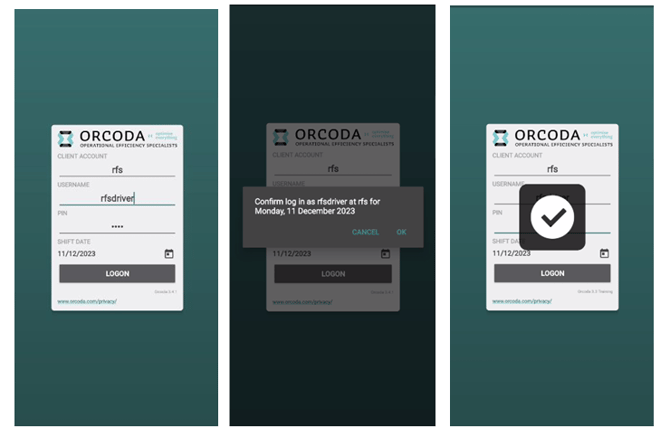
Once you have downloaded the app, you will need to use the credentials provided to you to log in. The details you require are:
1. Client Account Name
2. Driver Login Name
3. Driver Login Code
The log in screen is below:
Pre-Start Process
After clicking logon and confirming the resulting pop-up screen, a screen similar to the below will appear.
1. Click the 'Start Run' button.

2. App navigates to the pre-start declaration form, complete that to proceed with the processing of orders.
Complete pre-start declaration
1. Complete the Safety and Compliance Declaration form before the shift start.
2. Once check marks are completed, the acknowledge word will appear, if not report to the Manager.

3. The Driver can tap on the 'Acknowledge' button to go back to the job list page.
On-the-Road Process
Pre-departure
The address of the first job is shown on the run sheet page as per the image in the pre-start process step 1. The jobs are automatically shown in correct sequence with the next job at the top of the list. If you require further information on the next job just tap that job.
Further information and options will appear like in the image below.

Some action-options are available and include the three icons at the top. From left to right these are:
1. Navigation - by clicking on this icon your devices default navigation will begin to navigate you to the destination.
2. Job Detail Sheet - once clicked a PDF with more job detail will appear.
3. Photo Option - at any point you can upload a relevant photo to this job. This can be done from any location and can also be done prior, during or after the job. (Note: if you want to add a photo to a completed job, you can find completed jobs near the bottom of the run sheet.
Pickup Job Process
When the Play button is pressed, the action buttons (exception and next) will be displayed.
When the Next button is pressed, the job status will change to 'Started'.

Delivery Job Process
When loading the deliver items from depot, driver needs to select the jobs and click on load icon on the bottom corner of the job list page. Now the status of the job is changed from 'Received' to 'Loaded'.
When the 'Play' button is pressed, the action buttons (exceptions and next) will be displayed.
When the 'Next' button is pressed, the job status will change to 'Started'.
Marking the Job Duration
The next button in the image below should be pressed to indicate the completion of the job. The job duration is defined as the duration from the start of operation to departure from the client location.

In order to record the correct job duration, the below process needs to be followed:
1. Arrive and park at client location, turn off the engine.
2. Press the 'Play' button in the image below.

3. Get back in the car and confirm the job completion on the app in the below image.
4. If delivery is successful, fill in the customer's name, comments, and signature on the signature page (optional) and click complete job button.

5. If delivery is unsuccessful, click on the exception button in the image below. This will navigate to a cannot complete page. Choose the reason for non-delivery from teh drop down, comments and click complete job button.

Job Completion
After completing the job and recording it the below image shows how the status is updated and appears on the job details screen.
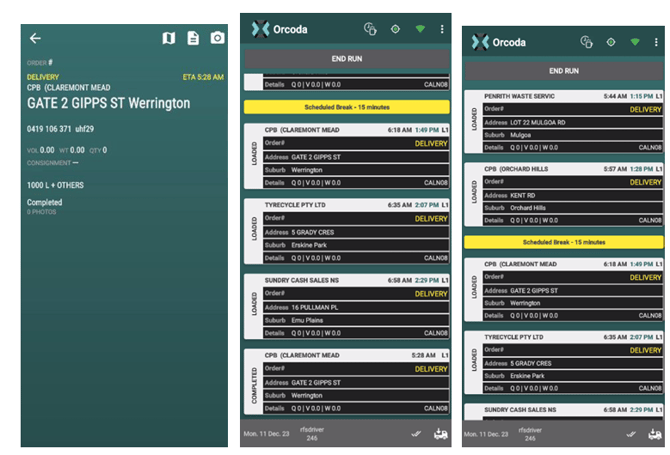
The updated status of all the jobs will be shown in the run page, at the bottom of the list as shown.
The final screenshot shows the scheduled breaks the driver needs to take during work. If the driver has missed a break or worked over time, he would be notified to take a break with a red banner on the top of the screen until he takes a break.
Breaks
The driver can manually take breaks by clicking on the break icon on the top as shown below, or when any scheduled break is assigned to the driver.

The break time is calculated and can be entered manually by the driver by clicking on the End Break button.
Run Completion
When the driver has completed all the assigned jobs, they should click on the End Run button.
The driver can logout from the app using the menu option on the top right corner.