Understanding the Runsheet Interface
The Runsheet section is the central hub for real-time dispatch operations. It allows users to monitor, manage, and modify runs and orders as the day progresses.
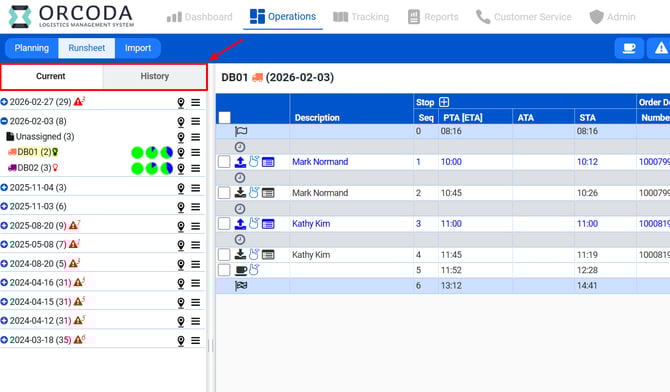
Current and History Tabs
The Runsheet section is divided into two main tabs:
- Current: This tab displays runsheets for the current and future dates, which is the primary area for on-the-day dispatching.
- History: This tab provides access to past runsheets. You can search for historical data by a specific date or a 7-day range from a selected date.
The Current and History tabs in the Runsheet section.
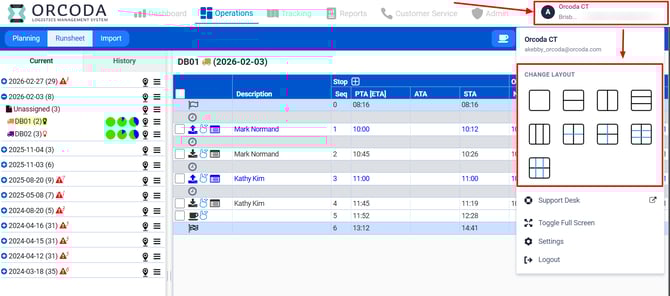
Customizing Your Workspace
You can customize the Runsheet layout to suit your workflow by clicking the Layout button. This allows you to drag and drop various panels into your workspace.
Click the Layout button to customize your view.
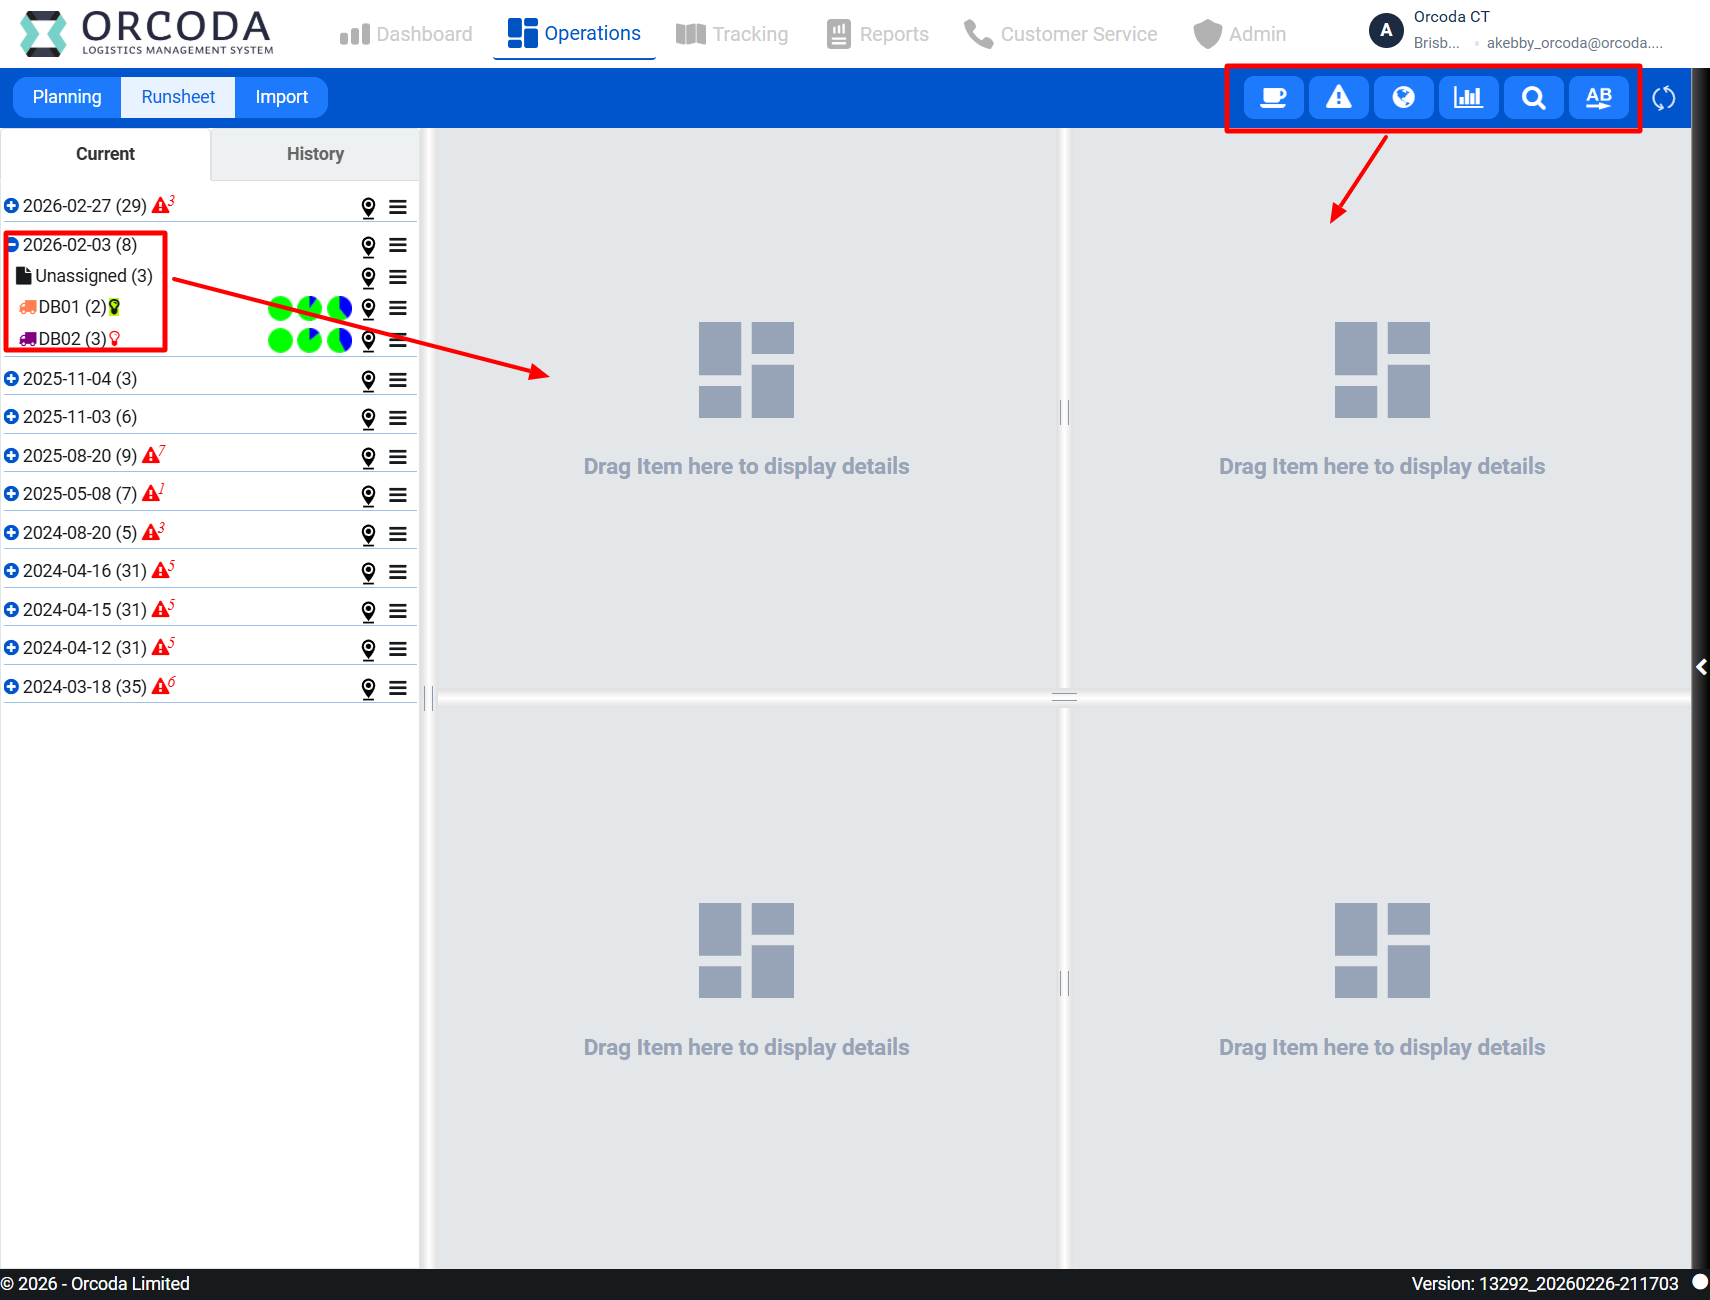
Available Panels:
- Runsheet Date: Displays a summary for every run or an overall summary for the selected date.
- Unassigned Folder: Lists all orders that are not yet allocated to a specific run for the selected runsheet date.
- Run: Shows the list of orders assigned to a specific vehicle/run.
- Violation: Displays a list of all violations associated with runs and orders.
- Map: Provides a visual representation of routes and order locations.
- Gantt Chart: Shows a timeline view of each run, including travel, service times, and breaks.
- Search Orders: A panel for finding specific orders.
Core Dispatching Functions
The Runsheet section provides a powerful set of tools for managing daily operations. The following functions are available to dispatchers.
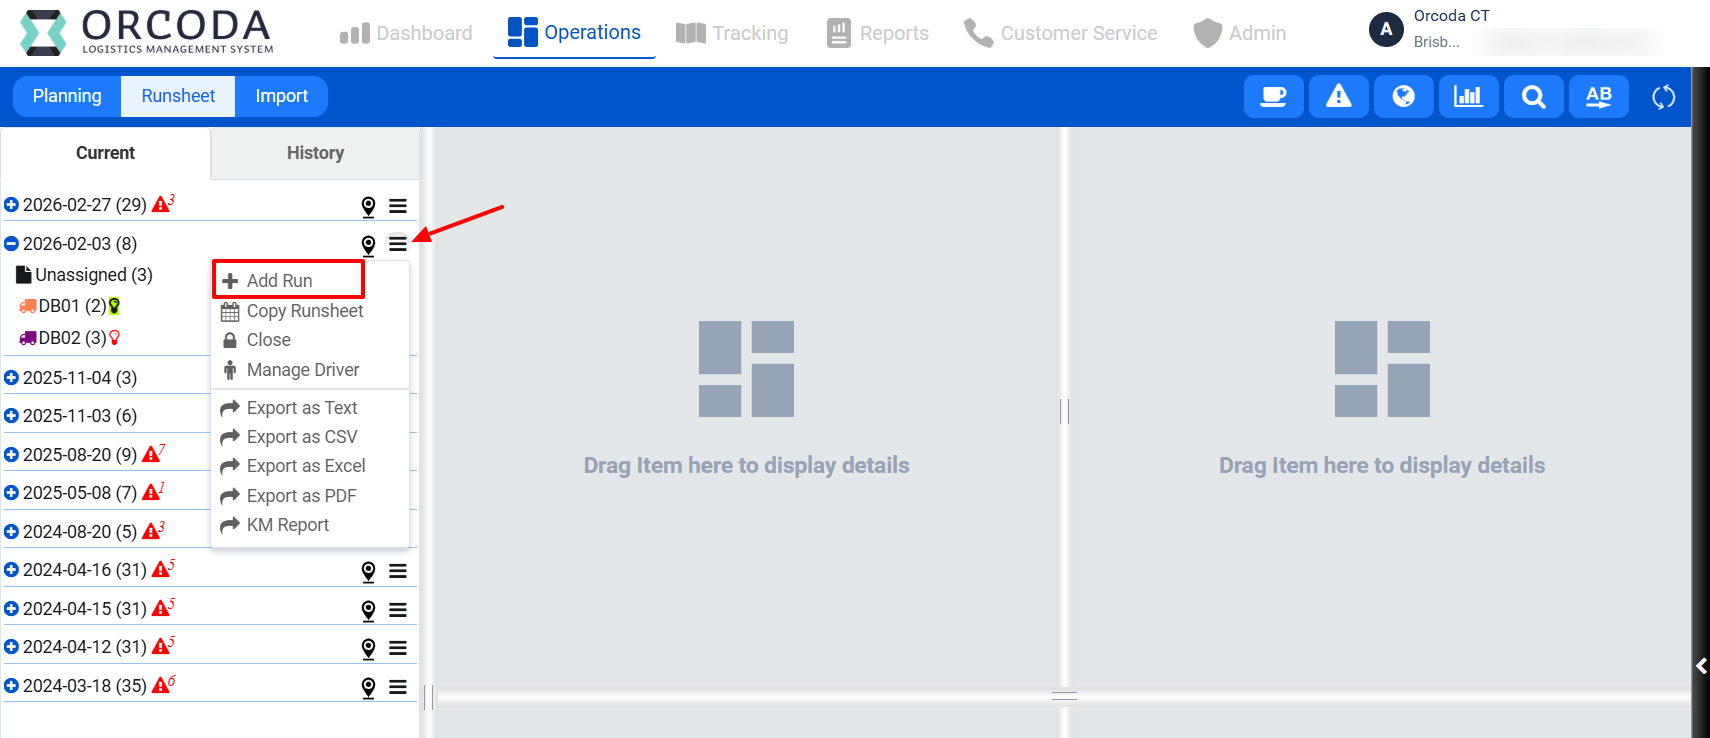
4.1.1 Add Runs to a Runsheet Date
To begin dispatching, you may need to add predefined runs to the day's runsheet.
- Select the desired runsheet date from the calendar view.
- Click the action menu and select Add Run.
- The "Add Runs to Runsheet" screen will appear, listing available runs.
- Check the boxes next to the runs you wish to add to the runsheet.
- Click the Save The selected runs will now appear under the runsheet date in the left-hand panel.
Select runs to add to the daily runsheet.
4.1.2 Allocate Unassigned Orders to a Run
You can assign jobs from the unassigned pool to a specific run using a simple drag-and-drop method.
- Select one or more orders from the "Unassigned Orders" panel or directly from the map.
- Click and hold the 'drag handle' icon (☰).
- Drag the selected order(s) and drop them onto the desired run in either the main run panel or the run list in the left-hand navigation panel.
The order will be allocated to the run, and the system will recalculate the route and timings.
Allocate an order by dragging it from the unassigned list to a run.
4.1.3 Move Orders Between Runs
If plans change, you can easily move an order from one run to another.
- In a run panel or on the map, select the order(s) you wish to move.
- Click and hold the 'drag handle' icon (☰).
- Drag the order(s) to the new run in either the main panel or the left-hand navigation panel.
The order will be removed from its original run and allocated to the new one.
Drag and drop an order to move it to a different run.
4.1.4 Deallocate/Unassign Orders
To remove an order from a run and return it to the unassigned pool, you can use one of several methods:
- Actions Menu: Select the order in the run panel, click "Actions", and choose "Unassign Orders".
- Drag to Panel: Drag the order from its run panel and drop it into the "Unassigned Orders" panel.
- Drag to Folder: Drag the order from its run panel and drop it onto the "Unassigned" folder in the left-hand navigation panel.
- From the Map: Select the order on the map and click the "Unassign" action in the pop-up.
Using the Actions menu to unassign an order.
4.1.5 Resequence Orders
To optimize the stop sequence for a run based on the current set of orders:
- Open the run panel for the desired run.
- Click the "Actions" menu and select Resequence Orders.
The system will automatically re-order the stops to create a more efficient route.
The system re-orders the route after resequencing.
4.1.6 View/Update Orders
You can view or modify the details of any order directly from the Runsheet page.
- Select the order in any panel (Unassigned, Run) and click "Actions" → "View/Edit Order", or click the view icon (👁) next to the order.
- The "Edit Order" screen will open, allowing you to update order details, pickup/delivery information, and geocode addresses.
- You can also view the order's history of actions and notifications in the "History" tab.
The Edit Order screen provides access to all order details.
4.1.7 & 4.1.8 Add, Remove, and Edit Breaks
Dispatchers can manage driver breaks within a run.
- Add Break: Select an order in a run panel, click "Actions" → "Add Break". A break will be inserted after that stop. You can also add a break via the Gantt Chart view.
- Remove Break: Select a break record in the run panel, click "Actions" → "Remove Break".
- Edit Break Duration: Select a break record, click "Actions" → "Edit Break Duration", enter the new duration, and save.
|
Note: The default break time is based on the duration specified for that day against the run's configuration. |
Adding a break after a specific order delivery.
4.1.12 Manually Complete an Order
If required, a supervisor can manually mark an order as complete.
- Select the order within its run.
- Click "Actions" → "Complete Orders".
- Confirm the action in the pop-up dialog.
|
Important: Once an order is manually completed, most actions (Unassign, Move, Cancel, Drag-and-Drop) become unavailable for that order. |
Confirmation prompt before manually completing an order.
4.1.13 Manually Cancel an Order
Orders can also be manually cancelled from the Runsheet page.
- Select the order to be cancelled.
- Click "Actions" → "Cancel Orders".
- Confirm the cancellation.
The cancelled order will be moved to the "Unassigned" folder, and most further actions on it will be disabled.
Cancelling an order via the Actions menu.
4.1.17 Update a Run's Start Time
If a driver is late or a run's start time needs to be adjusted, you can update it before the run has officially started.
- Click the action menu for the specific run.
- Select "Update Start Time".
- Enter the new start time and save.
This is useful for ensuring that ETAs and schedules are recalculated accurately based on the actual start time.
Adjusting a run's start time for on-the-day changes.
4.1.18 Re-Open a Run
A run that has been closed or ended (e.g., by the driver on the mobile app) can be re-opened by a dispatcher. This function is only enabled for runs that are in a closed/ended state.
The status of a run is indicated by an icon:
- - The run has not started.
- - The run has started.
- - The run has closed/ended. The "Re-Open Run" option will be available.
Monitoring and Reporting Tools
4.1.9 & 4.1.10 View Routes on Map and Gantt Chart
Visual monitoring is a key part of dispatching. Drag the Map or Gantt Chart panels into your workspace to get a real-time overview.
- Map View: Click the map icon next to a run (or the main runsheet date) to display its route(s). The route color corresponds to the run color.
- Gantt Chart View: This panel shows a timeline for each run, illustrating travel time, service time at each stop, and breaks. You can adjust the time scale for more or less detail. Stops are represented by rectangles, and breaks by oblong shapes.
The Gantt Chart provides a timeline visualization of run activities.
4.1.11 View Run/Order Violations
The system flags potential issues as violations. These are warnings and do not prevent processing. Violations can be seen in the Violations panel or as icons next to the relevant item.
Violation types include:
- Oversized: The run's volume capacity is exceeded.
- Overweight: The run's weight capacity is exceeded.
- Overtime: The run's total working time is exceeded.
- Outside of time window: An order's ETA is outside its required delivery window.
A time window violation is indicated by a clock icon on the order.
4.1.14 View Customer Service Report (CSR)
The CSR, or proof-of-delivery (POD), can be viewed for any order. Click the report icon next to an order to open the CSR. This document contains customer details, order information, job status history, and any photos taken at delivery. The CSR can be printed or downloaded as a PDF.
Example of a Customer Service Report.
4.1.19 Close Runsheet
At the end of the day, historical runsheets should be closed. This process allows you to manage any unprocessed orders.
- Navigate to a past date in the "Current" tab or find it in the "History" tab.
- Select "Close Runsheet" from the runsheet's action menu.
- A screen will appear listing all orders that were not completed (e.g., Allocated, Loaded, Unassigned).
- For each order or group of orders, you can choose an action:
- Leave as is: The order's status remains unchanged.
- Move to Inbox: The order is returned to the Inbox for future re-planning.
- Complete orders: The order status is updated to "Completed by Supervisor".
- Cancel orders: The order status is updated to "Cancelled".
- Move to Runsheet: The order is moved to a new, future runsheet date.
- After assigning actions, click the "Close Runsheet" button to finalize the process. The runsheet will then be moved to the "History" tab.
|
Note: You cannot close a runsheet for the current or a future date. |
The Close Runsheet interface for handling unprocessed orders.
4.1.20 Export and Copy Runsheet
- Export Runsheet: You can export the full runsheet data to an Excel file or a comma-delimited text file (CSV) via the runsheet's action menu.
- Copy Runsheet: This feature allows you to copy an entire runsheet (runs and orders) to a new date for planning purposes. The copied runsheet will appear on the Planning page.